User Manual — Shift Management System
A complete guide to the Newbury Soup Kitchen Volunteer Shift Management System, covering everything from account setup to AI-powered scheduling.
1 Introduction
Newbury Soup Kitchen Volunteer Shift Management System is a web-based application designed to simplify the organisation of volunteers and event shifts management. The application sends automated notifications through Telegram, allowing volunteers to quickly sign up for or cancel shifts directly within the group chat, without needing to access the main system.
The system allows:
- Volunteers to view available events and submit applications
- Volunteers to cancel an application
- Managers to create, update, duplicate, and delete events
- Managers to view volunteer applications and approve or reject them
- Managers to assign volunteers to shifts
- AI automatic scheduling of volunteers taking their skills and availability into consideration
- Automatic Telegram notifications to keep related people informed
2 System Requirements
- A device with internet access
- A modern web browser: Google Chrome, Mozilla Firefox, Microsoft Edge, or Safari
- A Telegram account (for receiving notifications)
- No technical knowledge is required
3 Getting Started
3.1 Accessing the Application
- Open your web browser.
- Navigate to the application URL.
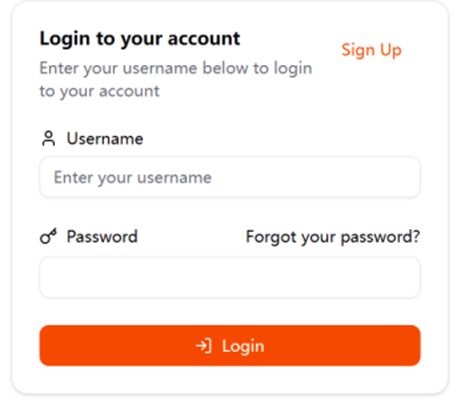
- The Login page will be shown.
3.2 Creating an Account
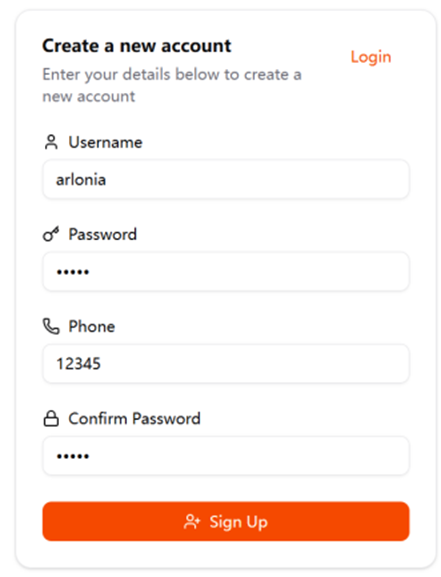
All accounts created through the Sign Up form are volunteers. Only an existing administrator can promote an account to the Admin role.
- On the Login page, click the 'Sign Up' in the top-right corner.
- Enter your Username.
- Enter your Phone Number. This is used to link your account to the Telegram bot for notifications.
- Enter a Password and confirm it.
- Click 'Sign Up'.
3.3 Logging In
- Enter your Username and Password.
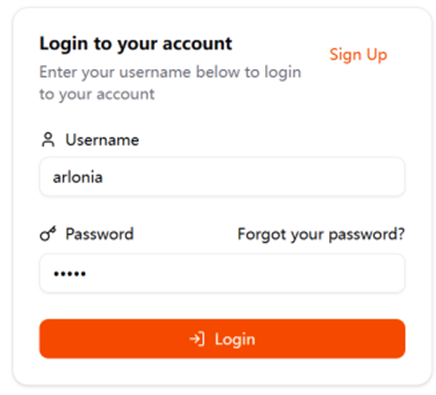
- Click 'Login'.
- You will be redirected to the Home Dashboard.
- If you forget your password, click 'Forgot your password?' link on the Login page.
3.4 Joining the Telegram Group and Linking Your Account
The system delivers notifications via Telegram. Complete all four steps below to start receiving them.
- Join the organisation's Telegram group (your manager will share the invite link).
- Open Telegram, search for the bot, and send
/start.
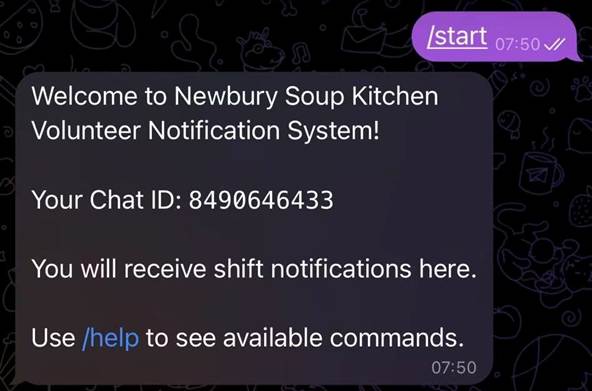
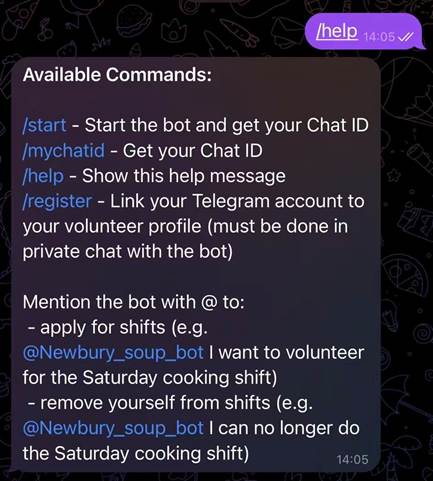
Additional bot commands available at any time:
/help— displays all commands./mychatid— returns your Telegram Chat ID.

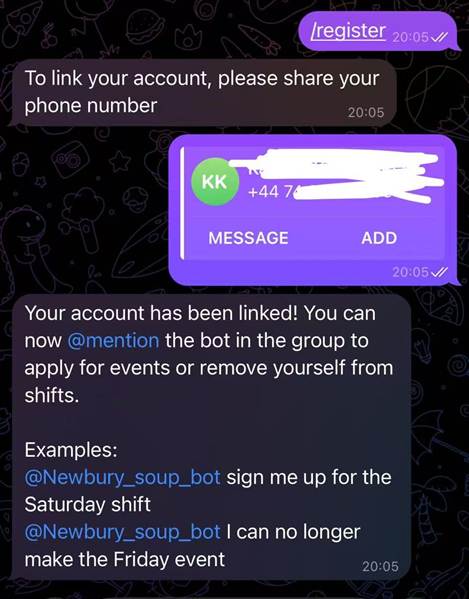
- Open a private chat with the bot and send
/register. The bot will ask you to share your phone number — tap the 'Share Phone Number' button. The system matches this number to your profile automatically.
- Ensure Telegram notifications are enabled on your device.
Once linked, you will receive:
- Announcements when new events are created
- Reminders the day before an event
- Alerts when event details (date, time, location) change
- Notifications when an event is cancelled
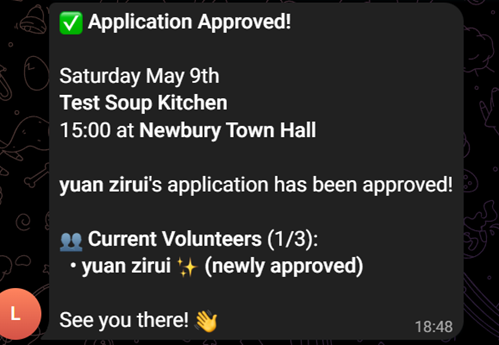
- A group announcement when a volunteer's application is approved, showing the new volunteer list with the newly approved member highlighted
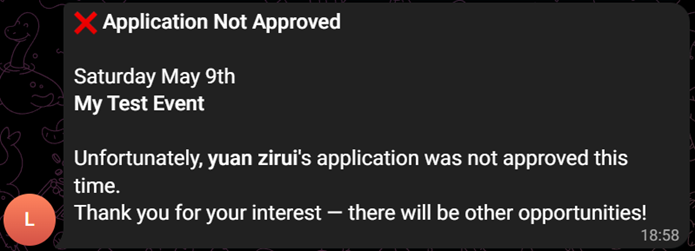
- A group announcement when an application is rejected
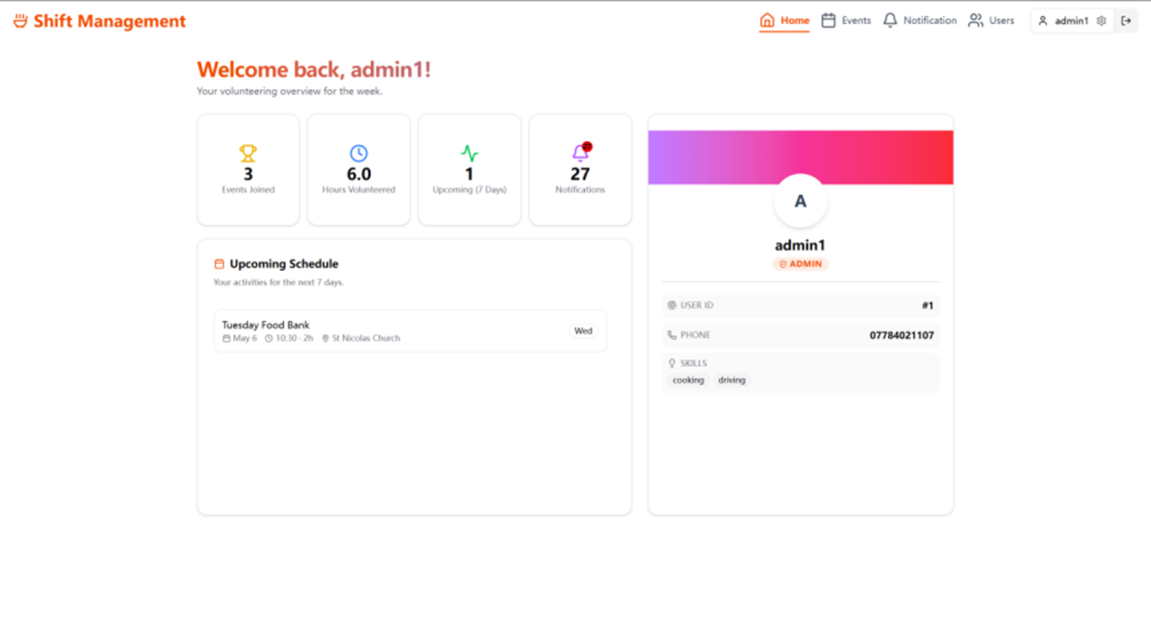
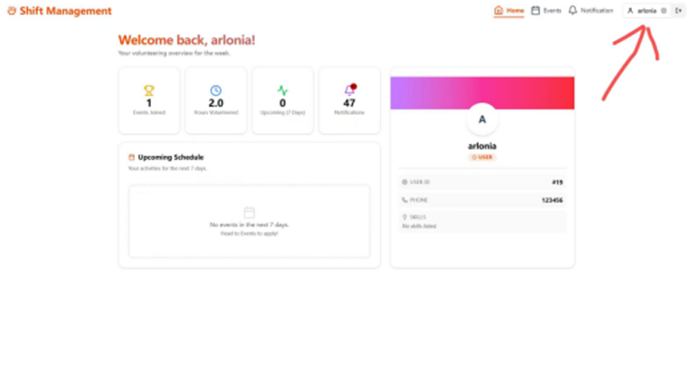
4 Dashboard (Home Page)
After logging in you are taken to the Dashboard. It displays:
- Events Joined — the total number of shifts you have been assigned.
- Hours Volunteered — total accumulated hours.
- Upcoming (7 Days) — number of shifts scheduled in the next seven days.
- Notifications — a count of your notifications.
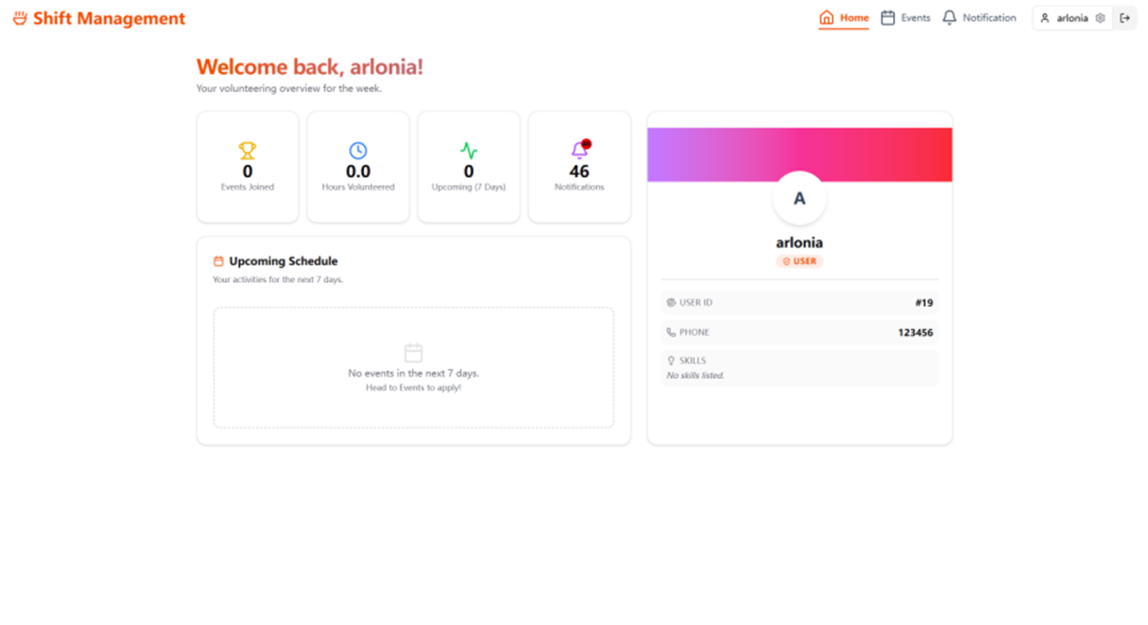
Your profile card is shown on the right side of the Dashboard, displaying your User ID, phone number, role, and current skills.
5 Features for Volunteers
5.1 Viewing Events
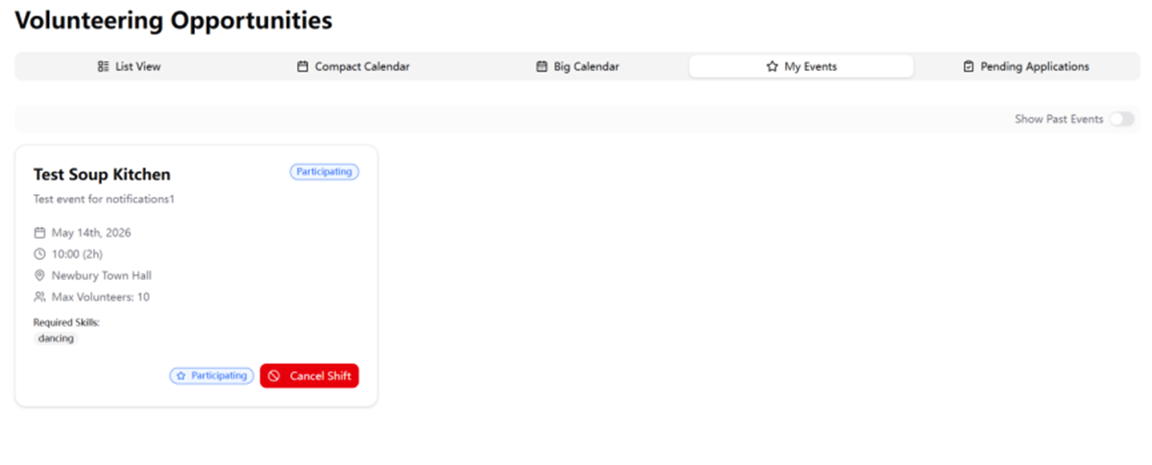
Go to Events from the navigation bar. Choose one of five tabs:

- List View — event cards. Each card shows: event name, time, location, duration, maximum volunteer number, required skills, and your current application or shift status.

By default, past events are hidden in the List View. Toggle 'Show Past Events' to include them.
- Compact Calendar — a mini-calendar; select a date to see events on that day.
- Big Calendar — a full-size month/week/day calendar where events shown as coloured blocks.
- My Events — only the events which you will participate in. Toggle 'Show Past Events' to include completed events.
- Pending Applications — events where your application is pending. Toggle 'Show Past Events' to show previous events.
5.2 Applying for a Shift
To apply:
- Go to Events from the navigation bar and click 'List View' tab.
- Click the 'Apply' button on the event card.
- A pop-up notification confirms "Application submitted successfully!"
- Your status on that card changes to 'Pending'.
- Once a manager approves your application, your status changes to 'Approved' and the event appears in the 'My Events' tab.
Your application can move through the following statuses:
| Status | Meaning |
|---|---|
| Pending | Application submitted; waiting for manager review. |
| Approved | Manager has approved the application; a shift has been created. |
| Rejected | Manager has declined the application. You may re-apply. |
| Cancelled | You withdrew the application. You may re-apply. |
- The event has already reached its maximum volunteer number.
- The event date has already passed.
- You already have a pending or approved application for this event.
- You already have a confirmed shift for this event.
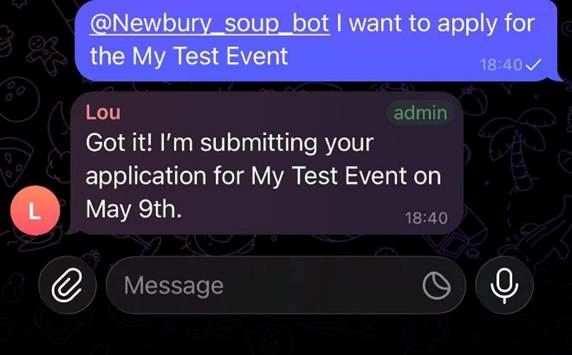
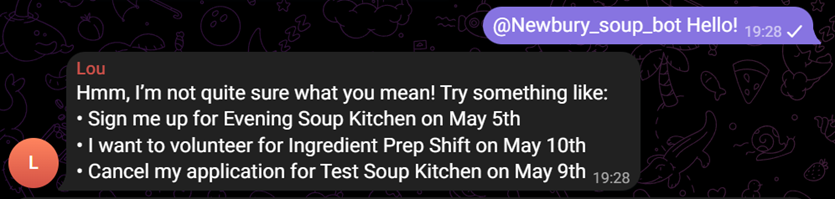
You can also apply via the Telegram bot by @mentioning it with a natural language request, for example: "@NewburySoupBot I want to apply for the Saturday soup kitchen shift."
5.3 Cancelling or Withdrawing an Application
To withdraw a pending application:
- Go to the 'Pending Applications' tab.
- Find the event and click 'Cancel Application'.
- The status changes to 'Cancelled' and the 'Apply' button re-appears.
To permanently remove a cancelled application record, go to the 'Pending Applications' tab, find the cancelled entry, and click 'Delete'.
You can also withdraw a pending application via the Telegram bot — @mention the bot with a natural language request, e.g., "@NewburySoupBot please cancel my application for the Thursday evening shift."
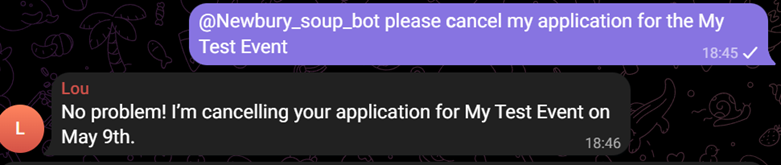
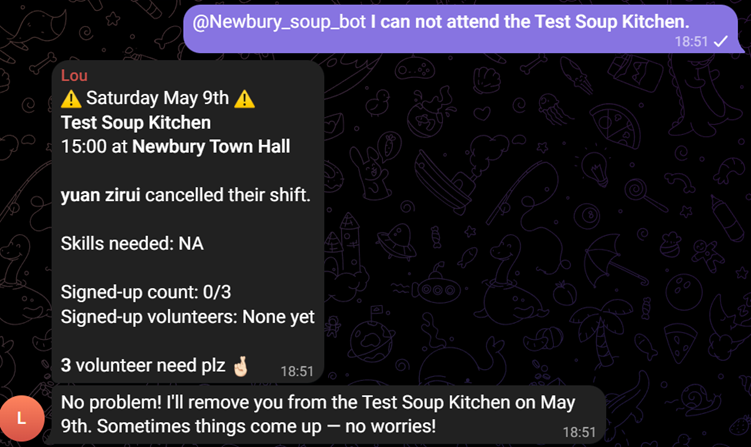
You can also cancel a confirmed shift via the Telegram bot — @mention the bot with a natural language request, e.g., "@NewburySoupBot I can not attend the Soup Kitchen Event." Then the bot removes you from the shift.
5.4 Viewing Your Notifications
Click 'Notification' in the navigation bar. This page lists all your notifications (broadcasts to all volunteers and any notifications addressed directly to you). Each card shows:
- Event name
- Notification type (REMINDER or SHORTAGE)
- Delivery channel
- Scheduled send time and sent time
- Status: 'Sent', 'Pending', or 'Failed'

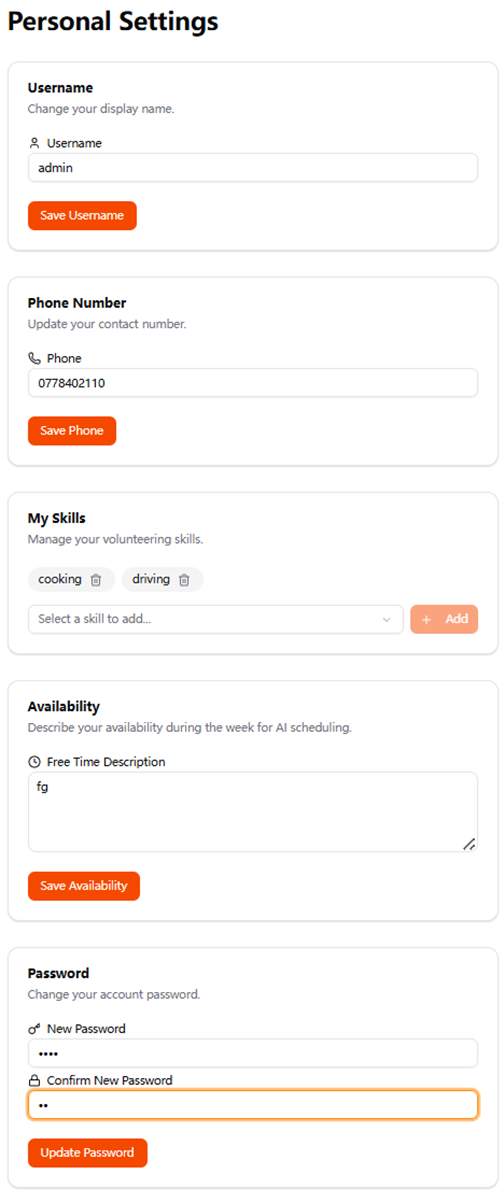
5.5 Managing Your Profile (Settings)
Click the username button in the top-right corner of the page to go to Personal Settings.
You can update:
- Username — your display name. Click 'Save Username' to apply.
- Phone Number — must match the number registered with Telegram for notifications to work. Click 'Save Phone' to apply.
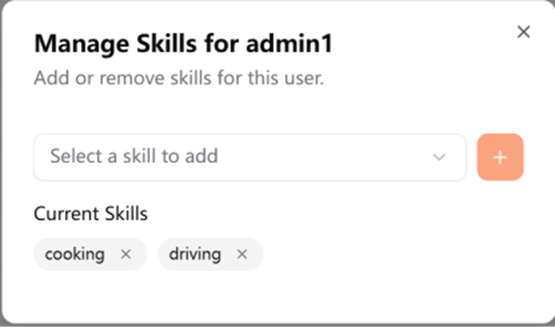
- My Skills — add skills from the dropdown and click Add; remove a skill by clicking the trash icon on its badge. Skills are matched against event requirements by the AI auto-scheduler.
- Availability — a description of your availability during the week, e.g., "I am free on Thursday mornings and Saturday afternoons." The AI scheduler uses this to avoid assigning you to clashing shifts. Click 'Save Availability' to apply.
- Password — enter a new password and confirm it, and then click 'Update Password'.
6 Features for Managers
Manager accounts have superior authority unlocked by an administrator. On the Events page, a 'Manage Events' / 'Apply for Events' toggle appears at the top. In 'Manage Events' mode, admin can create, modify or delete events. Switching to 'Apply for Events' mode lets a manager behave as a regular volunteer.
6.1 Creating an Event
- On the Events page, ensure 'Manage Events' is selected.
- Click 'Add Event' (top-right, Plus icon).
- Complete the form:
- Event Name (required)
- Description
- Date (required) and Time
- Duration (hours)
- Maximum Volunteers
- Location (required)
- Required Skills — select from the dropdown and click + to add; click × to remove
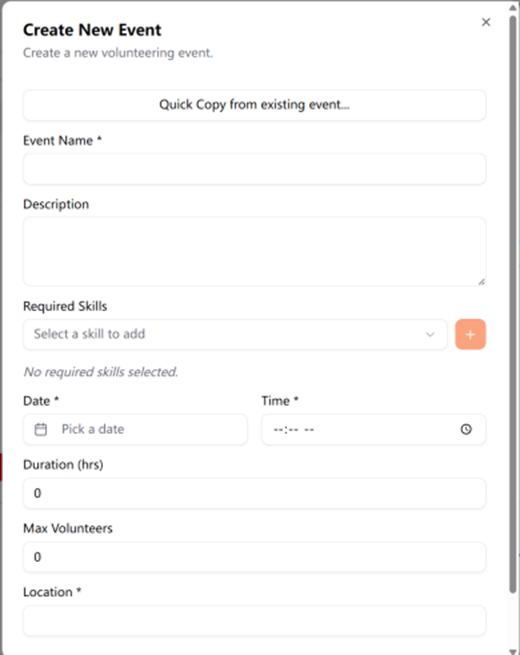
- Hint: Use Quick Copy — click "Quick Copy from existing event", select an event from the dropdown, and all its fields are automatically filled (with the date set to one week later). Edit if needed.
- Click 'Create'.
Once created:
- The event appears in the events list immediately.
- A Telegram notification is sent automatically to both the managers group and the volunteers group.
- A reminder notification is queued for future delivery.
6.2 Duplicating an Event
To quickly create a recurring event, click the 'Duplicate' icon on an existing event card. The creation form opens with fields filled automatically and the date set to one week later. Modify any fields if needed and click 'Create Event'.
6.3 Updating an Event
- Click the 'Edit' icon on the event card.
- Modify the fields.
- Click 'Update'.
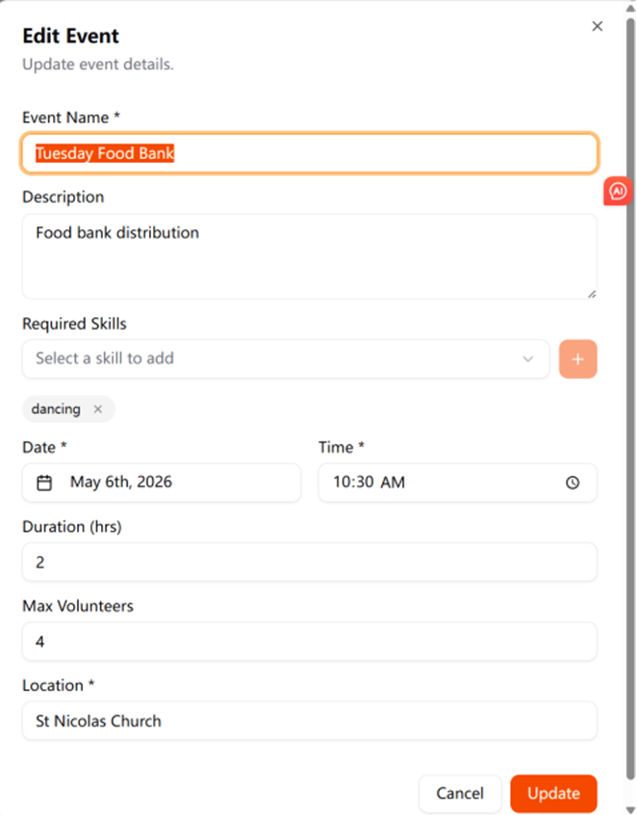
A Telegram notification listing the changed fields (e.g., "date, location") is sent automatically to both manager and volunteer groups.
6.4 Deleting an Event
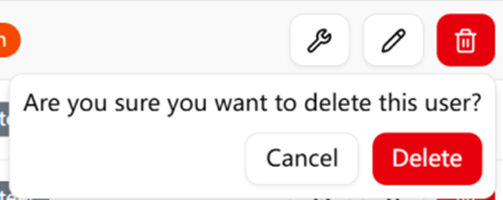
- Click the 'Delete' icon on the event card.
- Click the 'Delete' button to confirm.
6.5 Reviewing and Processing Applications
- Click the 'View Applications' icon on the event card.
- The Application Management dialog lists all applicants with their username and current status.
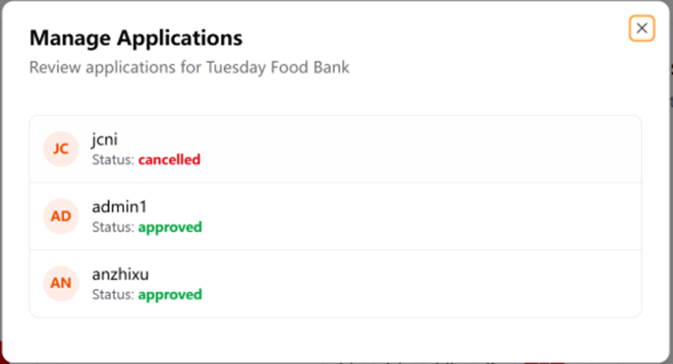
- Click '✓' to approve an application, then a shift is created automatically.
- Click '✕' to decline.
When a volunteer submits an application, the managers group receives a Telegram notification. When an application is approved, all volunteers receive a group Telegram message showing the new volunteer list with the newly approved member highlighted. When an application is rejected, all volunteers are notified via a group message.
6.6 Managing Assigned Volunteers Directly
Managers can assign volunteers without requiring them to submit an application:
- Click the 'Manage Volunteers' icon on the event card.
- In the dialog, select a user from the dropdown of available volunteers.
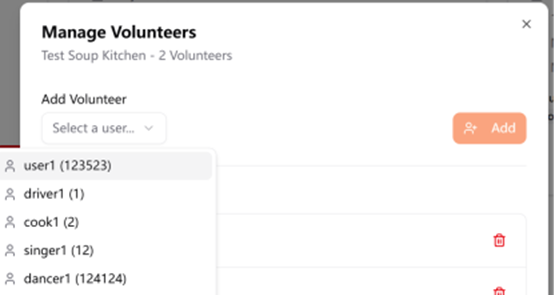
- The shift is created immediately.
- To remove a volunteer, click the 'remove' button next to their name.
6.7 AI Auto-Schedule
The AI Auto Scheduler automatically carries out volunteer assignments for the following week based on each volunteer's skills and stated availability.
- Click the 'AI Auto Schedule' button.
- The system analyses next week's events and volunteers' information.
- An assignments preview is displayed, each with a reasoning note.
- Review the assignments carefully.
- Click 'Apply All' to confirm, or close the dialog to discard.
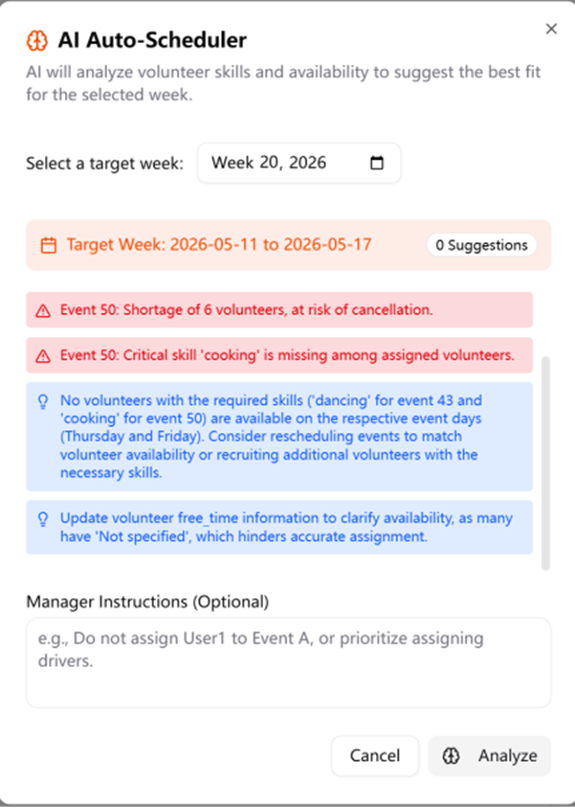
The preview may include warnings (e.g., an event may be canceled due to insufficient volunteers, or a required skill cannot be covered) and suggestions from the AI. Check these carefully before applying the schedule.
- Auto-schedule only covers the next calendar week; events on other dates are not included.
- Volunteers should keep their Skills and Availability up to date in Settings to ensure the accuracy of assignments.
6.8 Managing Notifications (Admin)
The Notifications page provides three tabs for admins:

- 'All' — every notification in the system, with full details.
- Admins can click 'Send Now' to deliver, or 'Delete' to remove the notification. For notifications that fail to deliver, click 'Reset to Pending' to retry.
- 'Volunteer Notifications' — all notifications sent to the volunteer group, with a status filter (All, Pending, Sent, Failed).
- 'My Notifications' — notifications addressed to the admin.
6.9 User Management (Admin)
The Users page on navigation bar (visible to admins only) contains two tabs:
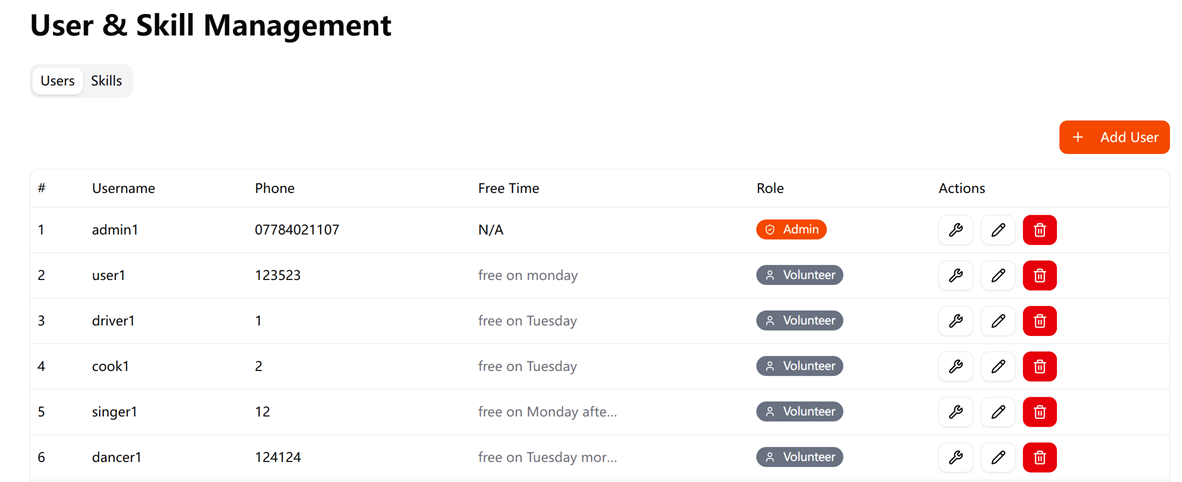
'Users' tab:
- Displays a table of all users with their username, phone, role, free time and actions.
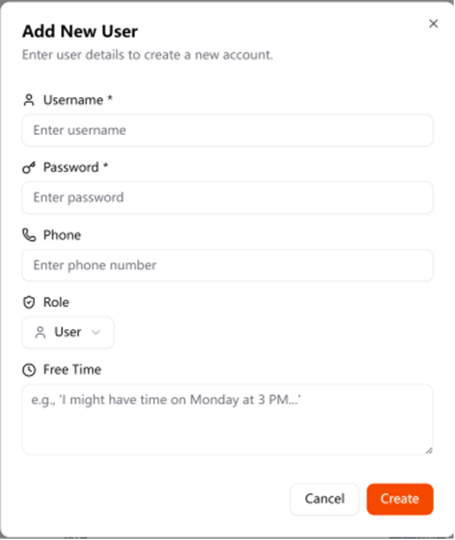
- 'Add User' button — opens a dialog to create a new user.
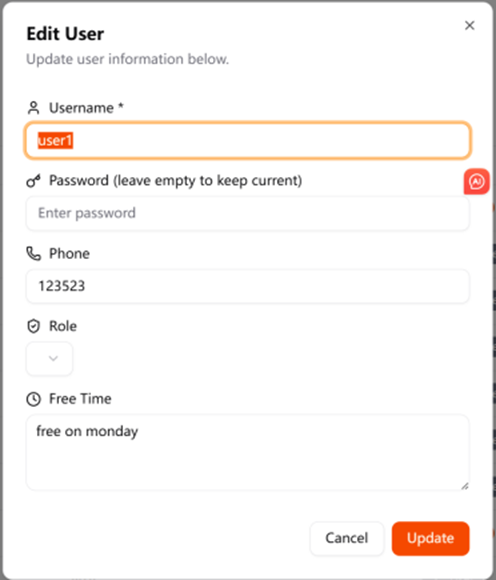
- 'Edit' button — modify user details.
- 'Delete' button — permanently removes the account.
- 'Manage Skills' button — add or remove skills for this user.
'Skills' tab:
- Lists all skills.
- Add a new skill: type the skill name in the input field and click 'Add Skill' (or press Enter).
- Delete a skill: click the trash icon. A dialog will warn that "This will remove it from all events and users." Click 'OK'.
7 Notifications (Telegram Integration)
The system is connected to a Telegram bot which automatically sends updates.
Automatic notification types:
- Event Created — Sent to all volunteers and managers when a new event is created.
- Event Updated — Sent to all volunteers and managers when event details (date, time, or location) change.
- Event Cancelled — Sent to the managers group immediately. Also sent to the volunteers group if any volunteer has a confirmed shift or a pending application for the event.
- 48-Hour Volunteer Callout (REMINDER) — Sent 48 hours before the event if the volunteer count is still below the required number.
- 5-Hour Final Reminder (SHORTAGE) — Sent 5 hours before the event to all volunteers, showing current sign-up count and the shortfall.
- Application Submitted — Sent to the managers group when a volunteer submits a new application.
- Application Approved — A group message sent to all volunteers, showing the new volunteer list with the newly approved member highlighted.
- Application Rejected — A group message sent to all volunteers.
| Type | Trigger | Recipients |
|---|---|---|
| REMINDER – New Event | Event created | Managers group + Volunteers group |
| REMINDER – Event Updated | Event details changed | Managers group + Volunteers group |
| REMINDER – Cancelled | Event deleted | Managers group + Volunteers group (if affected) |
| REMINDER – Before the event | 48 hours and 5 hours before event | Volunteers group |
8 Troubleshooting
8.1 I cannot receive Telegram notifications
- Ensure that you have already joined the organisation's Telegram group.
- Check you have shared your phone number.
- Verify that the phone number in Personal Settings exactly matches that in your Telegram settings.
- Ensure that Telegram notifications are enabled on your device.
8.2 I cannot log in
- Check the username is correct (case-sensitive).
- Check your password. If you forget it, click 'Forgot your password?' link to reset it.
- Ensure your internet connection is stable.
8.3 I cannot see any events
- Ensure you are logged in — unauthenticated users cannot view events.
- If there are no events, maybe there are no upcoming events. Contact a manager to confirm.
8.4 My application status has not changed
- The status of applications will remain 'Pending' until a manager approves or rejects them.
- Contact your manager if you have been waiting for a long time.
8.5 The Telegram bot does not understand my request
- Try to include the full name of the event and a clear description to avoid ambiguity.
- If the bot does not understand your request or cannot be sure, it will guide you to send the correct instructions.
8.6 The AI Auto-Schedule produced unexpected results
- Ensure the Skills and Availability of every volunteer are up to date.
- The auto-schedule only covers the next week.
- Try once again.
- Adjust individual assignments manually.
9 Data and Privacy
- Your personal information is stored securely in the organisation's database.
- Data is only used for managing events and communication.
- The system does not share your personal information with any third parties.
- Passwords are hashed before storing in the database.
- You may update or remove your personal details at any time via Personal Settings.
10 Frequently Asked Questions
/register, then tap 'Share Phone Number'. The system will match your phone number to your account and then you can receive notifications.11 Summary
This system simplifies the process of managing volunteer shifts by:
- Providing a user-friendly UI on any device
- Automating Telegram notifications so no one misses important updates
- Using AI to assist managers with scheduling based on volunteers' skills and availability
- Ensuring admins have full control over users, skills, events, and notifications
For further assistance, please contact your organisation's system administrator.